RDP Connection in Windows

How do I set up a PC for Remote Desktop?
For Windows 10, do the following:
- On the device you want to connect to, open Settings.
- Select System and then Remote Desktop.
- Use the slider to enable Remote Desktop.
- In general, it’s best to keep the PC awake and discoverable to facilitate connections. Click Show settings to go to the power settings for your PC, where you can change this setting.
Why can’t I connect using Remote Desktop?
Here are some possible solutions to common problems you might encounter when trying to connect to a remote PC.
- The remote PC can’t be found. Make sure you have the right PC name, and then check to see if you entered that name correctly. If you still can’t connect, try using the IP address of the remote PC instead of the PC name.
- There’s a problem with the network. Make sure you have internet connection.
- The Remote Desktop port might be blocked by a firewall. If you’re using Windows Firewall, follow these steps:
- Open Windows Firewall.
- Click Allow an app or feature through Windows Firewall.
- Click Change settings. You might be asked for an admin password or to confirm your choice.
- Under Allowed apps and features, select Remote Desktop, and then tap or click OK.
If you’re using a different firewall, make sure the port for Remote Desktop The remote PC might only allow PCs to connect that have Network Level Authentication set up.
- The remote PC might be turned off. You can’t connect to a PC that’s turned off, asleep, or hibernating, so make sure the settings for sleep and hibernation on the remote PC are set to Never (hibernation isn’t available on all PCs.).
Specific errors
Why do I get an “Insufficient privileges” error?
You are not allowed to access the session you want to connect to. The most likely cause is that you are trying to connect to an admin session. Only administrators are allowed to connect to the console. Verify that the console switch is off in the advanced settings of the remote desktop. If this is not the source of the problem, please contact your system administrator for further assistance.
Why does the client say that there is no CAL?
When a remote desktop client connects to a Remote Desktop server, the server issues a Remote Desktop Services Client Access License (RDS CAL) stored by the client. Whenever the client connects again it will use its RDS CAL and the server will not issue another license. The server will issue another license if the RDS CAL on the device is missing or corrupt. When the maximum number of licensed devices is reached the server will not issue new RDS CALs. Contact your network administrator for assistance.
Why did I get an “Access Denied” error?
The “Access Denied” error is a generated by the Remote Desktop Gateway and the result of incorrect credentials during the connection attempt. Verify your username and password. If the connection worked before and the error occurred recently, you possibly changed your Windows user account password and haven’t updated it yet in the remote desktop settings.
What does “RPC Error 23014” or “Error 0x59e6” mean?
In case of an RPC error 23014 or Error 0x59E6 try again after waiting a few minutes, the RD Gateway server has reached the maximum number of active connections. Depending on the Windows version running on the RD Gateway the maximum number of connections differs: The Windows Server 2008 R2 Standard implementation limits the number of connections to 250. The Windows Server 2008 R2 Foundation implementation limits the number of connections to 50. All other Windows implementations allow an unlimited number of connections.
What does the “Failed to parse NTLM challenge” error mean?
This error is caused by a misconfiguration on the remote PC. Make sure the RDP security level setting on the remote PC is set to “Client Compatible.” (Talk to your system admin if you need help doing this.)
What does “TS_RAP you are not allowed to connect to the given host” mean?
This error happens when a Resource Authorization Policy on the gateway server stops your user name from connecting to the remote PC. This can happen in the following instances:
- The remote PC name is the same as the name of the gateway. Then, when you try to connect to the remote PC, the connection goes to the gateway instead, which you probably don’t have permission to access. If you need to connect to the gateway, do not use the external gateway name as PC name. Instead use “localhost” or the IP address (127.0.0.1), or the internal server name.
- Your user account isn’t a member of the user group for remote access.
General Remote Desktop connection troubleshooting
Check the status of the RDP protocol on a remote computer
You can configure your PC for remote access with a few easy steps.
- On the device you want to connect to, select Start and then click the Settings icon on the left.
- Select the System group followed by the Remote Desktop item.
- Use the slider to enable Remote Desktop.
- It is also recommended to keep the PC awake and discoverable to facilitate connections. Click Show settings to enable.
- As needed, add users who can connect remotely by clicking Select users that can remotely access this PC.
- Members of the Administrators group automatically have access.
- Make note of the name of this PC under How to connect to this PC. You’ll need this to configure the clients.
Check the status of the RDP protocol on a remote computer
Important
Follow this section’s instructions carefully. Serious problems can occur if the registry is modified incorrectly. Before you start modifying the registry, back up the registry so you can restore it in case something goes wrong.
To check and change the status of the RDP protocol on a remote computer, use a network registry connection:
- First, go to the Start menu, then select Run. In the text box that appears, enter regedt32.
- In the Registry Editor, select File, then select Connect Network Registry.
- In the Select Computer dialog box, enter the name of the remote computer, select Check Names, and then select OK.
Navigate to HKEY_LOCAL_MACHINE\SYSTEM\CurrentControlSet\Control\Terminal Server.
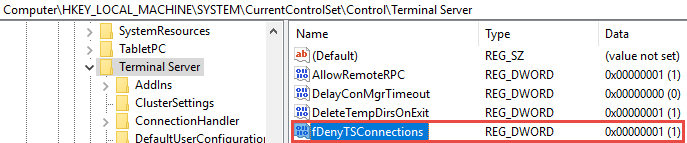
- If the value of the fDenyTSConnections key is 0, then RDP is enabled.
- If the value of the fDenyTSConnections key is 1, then RDP is disabled.
- To enable RDP, change the value of fDenyTSConnections from 1 to 0.
Check whether a Group Policy Object (GPO) is blocking RDP on a local computer
If you can’t turn on RDP in the user interface or the value of fDenyTSConnections reverts to 1 after you’ve changed it, a GPO may be overriding the computer-level settings.
To check the group policy configuration on a local computer, open a Command Prompt window as an administrator, and enter the following command:
cmdCopy
gpresult /H c:\gpresult.htmlAfter this command finishes, open gpresult.html. In Computer Configuration\Administrative Templates\Windows Components\Remote Desktop Services\Remote Desktop Session Host\Connections, find the Allow users to connect remotely by using Remote Desktop Services policy.
- If the setting for this policy is Enabled, Group Policy is not blocking RDP connections.
If the setting for this policy is Disabled, check Winning GPO. This is the GPO that is blocking RDP connections.


Check whether a GPO is blocking RDP on a remote computer
To check the Group Policy configuration on a remote computer, the command is almost the same as for a local computer:
cmdCopy
gpresult /S <computer name> /H c:\gpresult-<computer name>.htmlThe file that this command produces (gpresult-<computer name>.html) uses the same information format as the local computer version (gpresult.html) uses.
Modifying a blocking GPO
You can modify these settings in the Group Policy Object Editor (GPE) and Group Policy Management Console (GPM). For more information about how to use Group Policy, see Advanced Group Policy Management.
To modify the blocking policy, use one of the following methods:
- In GPE, access the appropriate level of GPO (such as local or domain), and navigate to Computer Configuration > Administrative Templates > Windows Components > Remote Desktop Services > Remote Desktop Session Host > Connections > Allow users to connect remotely by using Remote Desktop Services.
- Set the policy to either Enabled or Not configured.
- On the affected computers, open a command prompt window as an administrator, and run the gpupdate /force command.
- In GPM, navigate to the organizational unit (OU) in which the blocking policy is applied to the affected computers and delete the policy from the OU.
Check the status of the RDP services
On both the local (client) computer and the remote (target) computer, the following services should be running:
- Remote Desktop Services (TermService)
- Remote Desktop Services UserMode Port Redirector (UmRdpService)
You can use the Services MMC snap-in to manage the services locally or remotely. You can also use PowerShell to manage the services locally or remotely (if the remote computer is configured to accept remote PowerShell cmdlets).

On either computer, if one or both services are not running, start them.
Note
If you start the Remote Desktop Services service, click Yes to automatically restart the Remote Desktop Services UserMode Port Redirector service.
Check that the RDP listener is functioning
Important
Follow this section’s instructions carefully. Serious problems can occur if the registry is modified incorrectly. Before you start modifying the registry, back up the registry so you can restore it in case something goes wrong.
Check the status of the RDP listener
For this procedure, use a PowerShell instance that has administrative permissions. For a local computer, you can also use a command prompt that has administrative permissions. However, this procedure uses PowerShell because the same cmdlets work both locally and remotely.
- To connect to a remote computer, run the following cmdlet:
PowerShellCopy
Enter-PSSession -ComputerName <computer name>
Enter qwinsta.

- If the list includes rdp-tcp with a status of Listen, the RDP listener is working. Proceed to Check the RDP listener port. Otherwise, continue at step 4.
- Export the RDP listener configuration from a working computer.
- Sign in to a computer that has the same operating system version as the affected computer has, and access that computer’s registry (for example, by using Registry Editor).
- Navigate to the following registry entry:
HKEY_LOCAL_MACHINE\SYSTEM\CurrentControlSet\Control\Terminal Server\WinStations\RDP-Tcp
- Export the entry to a .reg file. For example, in Registry Editor, right-click the entry, select Export, and then enter a filename for the exported settings.
- Copy the exported .reg file to the affected computer.
- To import the RDP listener configuration, open a PowerShell window that has administrative permissions on the affected computer (or open the PowerShell window and connect to the affected computer remotely).
- To back up the existing registry entry, enter the following cmdlet:
PowerShellCopy
cmd /c'reg export "HKLM\SYSTEM\CurrentControlSet\Control\Terminal Server\WinStations\RDP-tcp" C:\Rdp-tcp-backup.reg'
- To remove the existing registry entry, enter the following cmdlets:
PowerShellCopy
Remove-Item -path'HKLM:\SYSTEM\CurrentControlSet\Control\Terminal Server\WinStations\RDP-tcp' -Recurse -Force
- To import the new registry entry and then restart the service, enter the following cmdlets:
PowerShellCopy
cmd /c'regedit /s c:\<filename>.reg'
Restart-ServiceTermService-Force
Replace <filename> with the name of the exported .reg file.
- Test the configuration by trying the remote desktop connection again. If you still can’t connect, restart the affected computer.
- If you still can’t connect, check the status of the RDP self-signed certificate.
Check the status of the RDP self-signed certificate
- If you still can’t connect, open the Certificates MMC snap-in. When you are prompted to select the certificate store to manage, select Computer account, and then select the affected computer.
In the Certificates folder under Remote Desktop, delete the RDP self-signed certificate.

- On the affected computer, restart the Remote Desktop Services service.
- Refresh the Certificates snap-in.
- If the RDP self-signed certificate has not been recreated, check the permissions of the MachineKeys folder.
Check the permissions of the MachineKeys folder
- On the affected computer, open Explorer, and then navigate to C:\ProgramData\Microsoft\Crypto\RSA\.
- Right-click MachineKeys, select Properties, select Security, and then select Advanced.
- Make sure that the following permissions are configured:
- Builtin\Administrators: Full control
- Everyone: Read, Write
Check the RDP listener port
On both the local (client) computer and the remote (target) computer, the RDP listener should be listening on port 3389. No other applications should be using this port.
Important
Follow this section’s instructions carefully. Serious problems can occur if the registry is modified incorrectly. Before you starty modifying the registry, back up the registry so you can restore it in case something goes wrong.
To check or change the RDP port, use the Registry Editor:
- Go to the Start menu, select Run, then enter regedt32 into the text box that appears.
- To connect to a remote computer, select File, and then select Connect Network Registry.
- In the Select Computer dialog box, enter the name of the remote computer, select Check Names, and then select OK.
Open the registry and navigate to HKEY_LOCAL_MACHINE\SYSTEM\CurrentControlSet\Control\Terminal Server\WinStations\<listener>.

- If PortNumber has a value other than 3389, change it to 3389.
Important
You can operate Remote Desktop services using another port. However, we don’t recommend you do this. This article doesn’t cover how to troubleshoot that type of configuration.
- After you change the port number, restart the Remote Desktop Services service.
Check that another application isn’t trying to use the same port
For this procedure, use a PowerShell instance that has administrative permissions. For a local computer, you can also use a command prompt that has administrative permissions. However, this procedure uses PowerShell because the same cmdlets work locally and remotely.
- Open a PowerShell window. To connect to a remote computer, enter Enter-PSSession -ComputerName <computer name>.
- Enter the following command:
PowerShellCopy
cmd /c'netstat -ano | find "3389"'

Check whether a firewall is blocking the RDP port
Use the psping tool to test whether you can reach the affected computer by using port 3389.
- Go to a different computer that isn’t affected and download psping from https://live.sysinternals.com/psping.exe.
- Open a command prompt window as an administrator, change to the directory in which you installed psping, and then enter the following command:
Copy
psping -accepteula <computer IP>:3389 - Check the output of the psping command for results such as the following:
- Connecting to <computer IP>: The remote computer is reachable.
- (0% loss): All attempts to connect succeeded.
- The remote computer refused the network connection: The remote computer is not reachable.
- (100% loss): All attempts to connect failed.
- Run psping on multiple computers to test their ability to connect to the affected computer.
- Note whether the affected computer blocks connections from all other computers, some other computers, or only one other computer.
- Recommended next steps:
- Engage your network administrators to verify that the network allows RDP traffic to the affected computer.
- Investigate the configurations of any firewalls between the source computers and the affected computer (including Windows Firewall on the affected computer) to determine whether a firewall is blocking the RDP port.
Note:
This is the standard process for RDP. Please do it at your risk and take backup of data.